Showing posts with label Crafts. Show all posts

How to Tie a Flat Bow

This may not be rocket science, but knowing how to tie a flat bow can come in handy at times.  Flat bows are great for scrapbook pages and homemade cards because they add dimension without too much bulk.  

Here is a short video of my hands.  Okay, okay, I mean here is a short video of my hands making a flat bow.  I hope you enjoy the tutorial!

Read more...

Charming necklaces


These beautiful custom necklaces are my latest creation.  Close To My Heart comes up with the neatest ideas!  Choose round or square, choose the background paper, and add charms that coordinate.  The whole project takes just a few minutes.  Of course Liquid Glass holds it all together.


At our recent family reunion, we split into "Guys & Gals" for a half an hour.  The guys played outside with the kids while the ladies made necklaces.  It was so much fun!  My daughter wanted to make her own necklace.  She chose the fun saying "I [heart] me" plus an owl charm and some bling.


Isn't it fun how personality shines through our crafts?  Check out the latest in Base & Bling custom necklaces.  You know you'll love it!

Read more...

A Valentine heart or two...or 40


My children made their own Valentines this year to give to classmates.  We decided to cut out hearts in a variety of sizes and colors using cardstock and the Cricut machine.


We used the Cricut Artiste cartridge from Close To My Heart to cut the hearts.  Both children liked this heart on page 51 (accent 2 in the upper right corner).  We cut both the plain and scalloped hearts at 5 inches in red, white, and several shades of pink.  Then we cut a few extra of the plain heart in 2 inch and 3 inch sizes.


Each Valentine was unique.  After gluing them together (the Bonding Memories Glue Pen worked great for this), the children stamped a Valentine message on the back and wrote their "to" and "from" messages. 


They were so busy crafting that they didn't even pay attention to the camera...


...so I had to ask them to please look!  I'm glad they were having so much fun with this project, because they each had 20 or more Valentines to make.  They worked on them here and there over the weekend, and put on the final touches last night.  Of course, candy was involved, too.  The funniest part was to see that they both made a Valentine for themselves so that they won't miss out on their own treats!

Happy Valentine's Day everyone!

Read more...

Easy Retro Ornament From Paper Scraps


Each year we make some sort of hand crafted ornament from paper.  I try to keep them simple so that my small children can participate.  This year I decided to make a retro-style ornament from 1/2 strips of paper left over from other projects.  You'll need seven strips for the ornament on the right, and five strips of paper for the ornament on the left.  I used the Pear & Partridge paper from Close To My Heart.


For the seven-strip ornament, cut the smallest strip at 3.5 inches long, two strips at 4 inches long, two strips at 4.5 inches long, and two strips at 5 inches long.  Set them out as shown.  The is the order in which to glue them together.


Tools needed:  adhesive, paper piercing tool, and micro-tip scissors.


Using just a small (about 1/2 inch) of adhesive on the end of each paper, begin to stack the strips from largest to smallest...


...and back up to the largest.  Your little stack of papers will look something like this.  Poke a hole at the bottom and put in a brad to hold it all together.
 

I used cranberry brads and baker's twine for my ornament.  Green brads and baker's twine would have looked just fine, too.


Next, line up the tops of all the paper strips and glue them together.  Poke a hole, string through the baker's twine and add a brad.  Ornament done.  (Tip:  I used the point of my micro-tip scissors to make the top hole big enough for the baker's twine.)


This is me, walking to the Christmas tree to hang my ornament.  I love Christmastime.  This photo feels so festive.  Yes, that is a Santa hat and a paper airplane on the top of the tree.  The children were 100% in charge of decorating the tree this year.


My children made the 5-strip ornaments (like the one on the left) because the were a little easier to work with. 


For the five strips, cut one strip at 4 inches long, two strips at 4.5 inches long, and two more at 5 inches long.  Assemble in the same manner as shown for the seven-strip ornament.


The patterned papers from Close To My Heart are perfect for this type of project because there is a unique design on each side of the paper.  So no matter which way you turn the ornament, it looks great!  Here is one side of an ornament...


...and here is the other side.  A totally different look.


Here is my son's retro-style ornament.  He chose the green brads and baker's twine, plus a little extra dash of bling.

Merry Christmas and happy crafting!

Read more...

A Little Pink Purse

I recently attended a training meeting in Omaha, Nebraska.  Over 100 consultant for the Close To My Heart company were there, and it was a blast!  The event organizers handed out this little pink purse to all the participants.  It is such a cute and simple craft idea that I just have to share it here.


To make this purse, simply use the Art Philosophy Cricut cartridge to cut cardstock into the shape shown below (see page 47 of the booklet that comes with the cartridge).


Fold the shape at about 1/3 of the way down to make the purse.  Staple on the sack of treats and then decorate as desired.  So easy.  I can't wait to make this sweet little project with friends!

Read more...

Sweet Surprises 3-D cards

At a recent workshop, some friends and I made these super-cute cards that have a built-in treat cup!  How fun is that!?!  Check out this video to see everything included in the card kit:


The 'sweet surprise' inside the card doesn't have to be a treat.  You can fill it with buttons, ribbon, or even a tiny gift!  A bracelet, earrings, or locket would fit quite nicely in the treat cup.  What a fun way to package a memorable gift.  Click here to order one of these Sweet Surprises 3-D card kits.

Read more...

A box for my cards

I've been making a lot of cards lately, so I thought perhaps I should make a cute box to store them all.  Here is what I whipped up yesterday by raiding my scrap papers and leftover stickers.


For just a teeny tiny moment I thought about giving this as a gift, but maybe I'll have to keep it for a awhile instead.  It is just too fun to look at the lovely colors and the simple elegance of it all.  What is it with women and bags, boxes, and other cute containers?!?  We just can't seem to resist.


Here is a more direct view of the top of the box.  My scrap papers and stickers came from the Florentine paper and Florentine Stickease sets.  The edges were distressed with a sponge dipped in Cocoa ink.


This is the first time I've tried out the font on my new Art Philosophy Cricut cartridge.  You can choose to have solid letters, or letters with these little cut-out circles.  I love how the circles add character and let the blue patterned paper show through.  Here is my best tip for attaching the letters and papers:  use Bonding Memories Glue for large papers and the smaller Bonding Memories Glue Pen for more precise coverage.  It takes just a few seconds to dry, but adheres very nicely.  They aren't kidding when they call it a bonding glue.  This stuff really sticks!


The fancy little pearls are self-adhesive and come in a variety of sizes and colors, so they were perfect for adding the finishing touches to the flowers, bird, and more. The basic card box is white and can be customized for whatever you choose.  My daughter wants her own little treasure box now! 

Read more...

Fancy favors

At this week's workshop, we made these fun, fancy favor boxes.  They could be used as favors at a special event, small gift boxes, or teacher apreciation treat containers.  The possibilities are endless.


The basic box is a shape cut from the Art Philosophy Cricut cartridge from Close To My Heart.  I made the largest size possible by pressing "Fit To Page," but these boxes could be made in a variety of sizes to fit your gift or treat item.


It is easiest to decorate the flat shape before folding it up into a box.  For this project, we added a flourish stamp from the A Flitter stamp set.


Next we used the new, very cool, Tapestry Velvet Rub-Ons, which come in either black or dark chocolate colors.  The velvet texture of these rub-ons is really quite amazing, and would make any project look elegant.


Finally, we added some Baker's Twine and sheer ribbon.  The Baker's Twine is a fun twist on a traditional look.  I've heard it is all the rage lately!

Colored cardstock used:  Buttercup, Sorbet, and Lilac Mist.
  

Read more...

Tulip Treat basket


This little treat basket is made to look like a tulip.  My friend, Jeni, showed me the idea.
There are lots of photos in this tutorial, but the project is really simple and fast!
Even kids can make it easily.


For supplies, you will need:
Paper trimmer with scoring blade
Adhesive
Scissors
Stapler


You'll also need:
6x6" square of cardstock
5 3/4 x 5 3/4" square of patterned paper


Don't forget the candy.  It is the most important part.


Score the cardstock at 1.5" and 3" and 4.5"
Turn the cardstock 90 degrees and score again.


Here is the scoring diagrm.  Later we will be cutting, so for now, just focus on the scoring part.


Glue the patterned paper...


Place it on the back of the cardstock,


and secure.


Using the scoring guide pictured above, cut a short line at the half-way mark on each side.


Now you should be able to bring up two opposite sides.  This will form the inside of your basket.


Overlap with one of the outside flaps...


...and staple.  So easy.


Here is the important part.  Bring up the other outside flap.  Have the two corners point to each other.  Your project won't look a tulip if you skip this essential step.


Fold and staple the same on the other side.  Here I was putting in the last staple, which can be a little tricky.


Tulip treat basket...


Tulip treat basket filled with salt-water taffy!


My son loves green, so we had to make a green version, just for fun.
Enjoy!  Let me know how many tulips you make!

Read more...

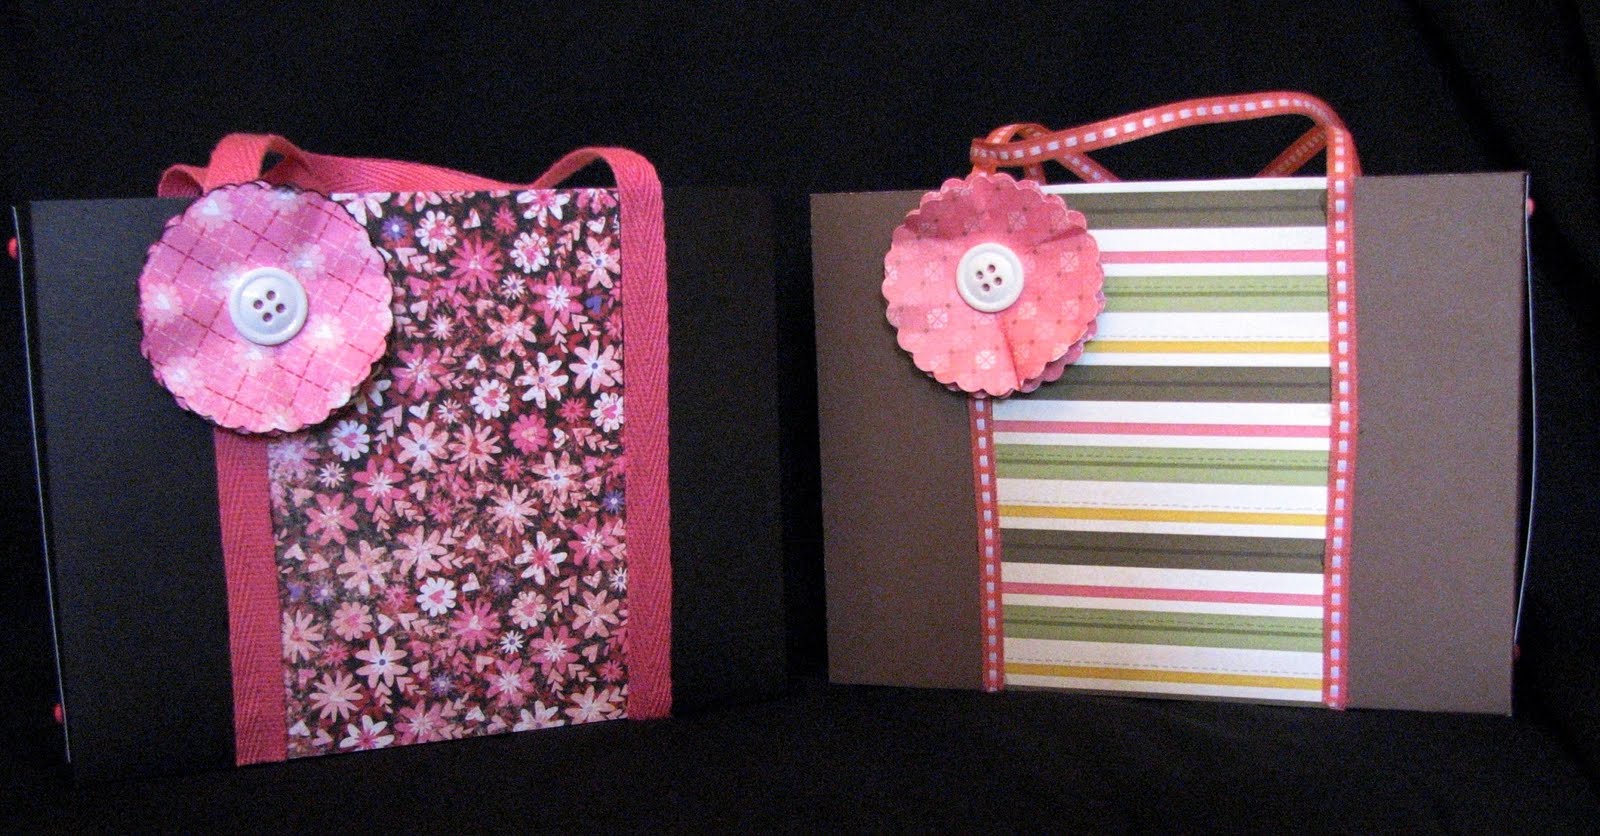
Card and purse set


These purses are so easy to make, and a set of greeting cards will fit inside perfectly!


Here is a photo showing the greeting cards/envelopes inside. 
It is a beautiful way to give a set of cards as a gift!

Paper pacekts used:  Sweetheart (purse on the left) and Mayberry (purse on the right)

Materials needed:
1 sheet of cardstock, 8.5 x 11 inches
2 pieces of patterned paper, 3 x 4.5 inches
2 lengths of ribbon, each 16 inches long
scoring blade
scallop punch
buttons
brads
adhesive

Purse Instructions:
1)  Score the cardstock piece at 1.25 (1 1/4) inch in from each side.  Score at 4.5 (4 1/2) inch in from each end.  Fold and snip on the four score lines that are 1.25 (1 1/4) inches long.
2)  Decorate the purse with patterned paper, ribbon, and embellishments.
3)  Fold together purse and glue.  Add brads to sides for extra durability.
4)  Fill purse with invitation-size cards and envelopes.  (These are cards that are 5.5 x 4.25)

Hopefully I'll have a video ready shortly.

Read more...

About This Blog

  © Blogger template Shush by Ourblogtemplates.com 2009

Back to TOP